Unlike the good old days, things have changed. We have to ask our users for permission to track and target them, which is especially important for following GDPR rules. In this digital analytics article, I’ll try to explain how to setup a cookie consent banner to your website step-by-step and Consent Mode in Google Tag Manager. Enjoy!
Activate Consent Mode on Google Tag Manager
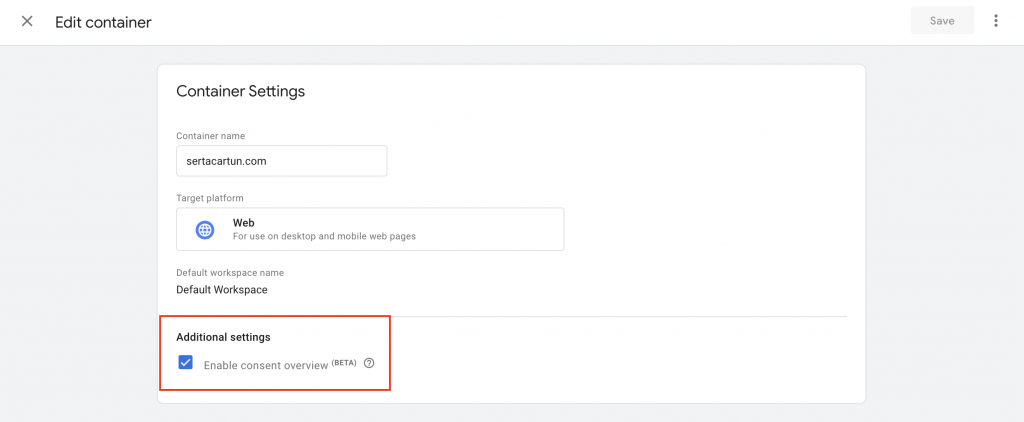
Navigate to Admin > Container Settings and enable consent overview setting. This will activate consent mode for the container. If you navigate to the tags section you will see a small consent overview button on the top-right, it will display configured and not configured tags for the consent.
Setup a Cookie Consent Banner
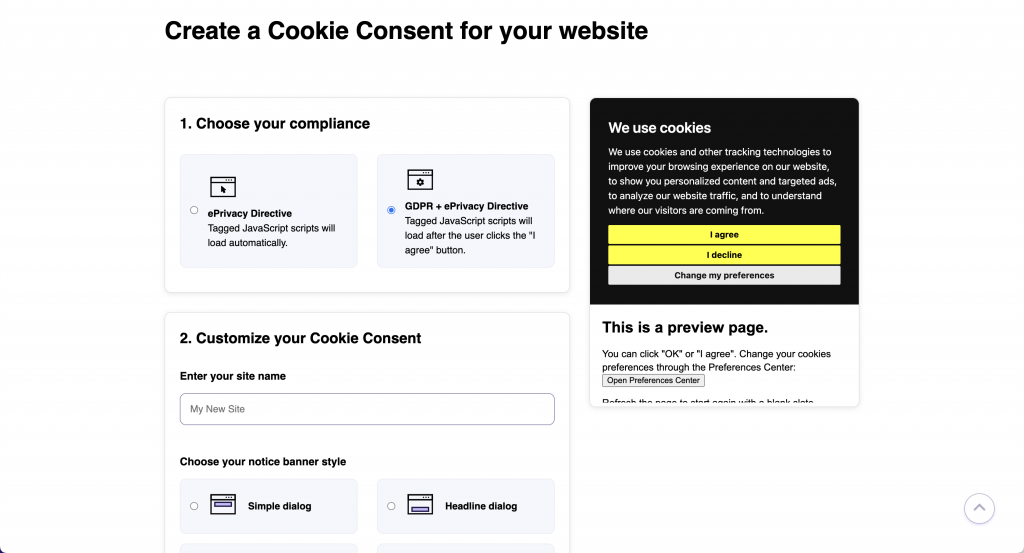
The first thing you need to do is selecting a CMP (consent management platform). In this article, we will use a free solution. You can easily create a consent banner for your website by visiting this link. Once you’ve made your adjustments, it will automatically generate a code that you can use to display the consent banner on your website. Create a custom HTML tag that will be triggered on all page views (ideally container loaded step) and that’s all ! now you have a consent banner.
Extract Consent Types From Cookies
Almost every CMP or Cookie Banner creates cookies after users accept or reject consent. You can easily see this in DevTools. Here’s an example with the consent banner I mentioned earlier:
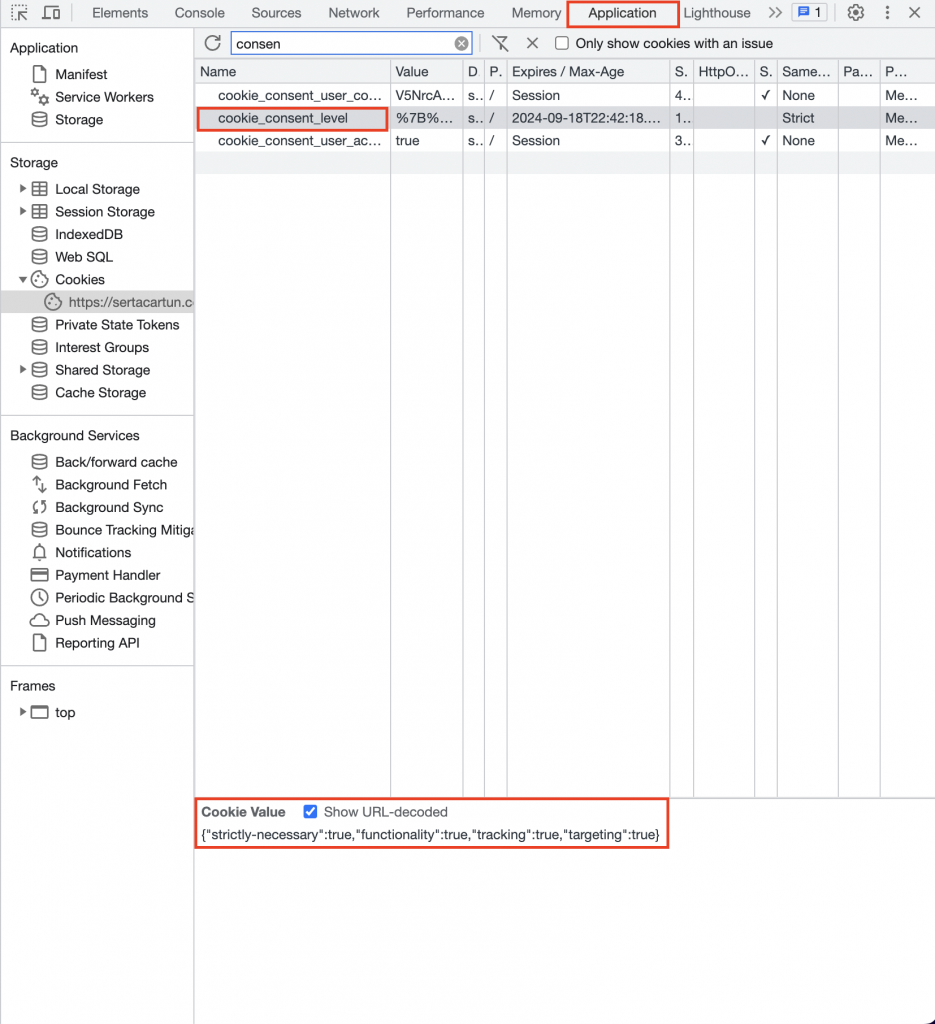
We need to extract each value from the cookie to use it in our consent settings. To do this, we’ll create some variables in GTM that will keep these values.
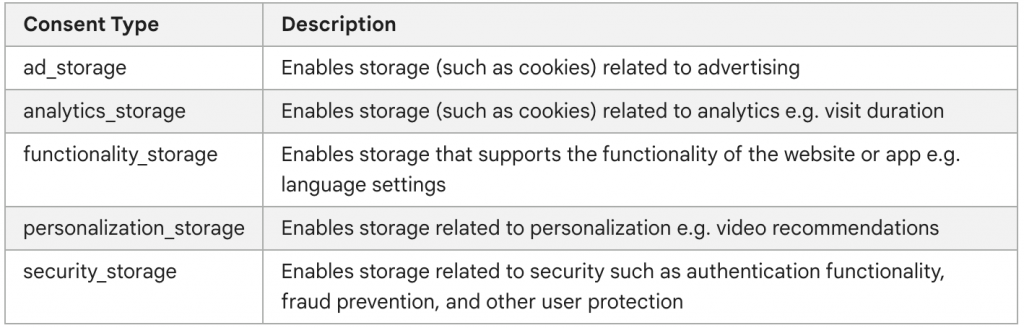
Consent settings request five different consent types. You can find the list below.
This means we need to create five different JavaScript variables. Ideally, if you don’t have a value for each in your consent cookie, you can use one value for different consent types. For instance, in our example cookie banner, we create a cookie for four different consent types, but we will use one of them for two consent types.
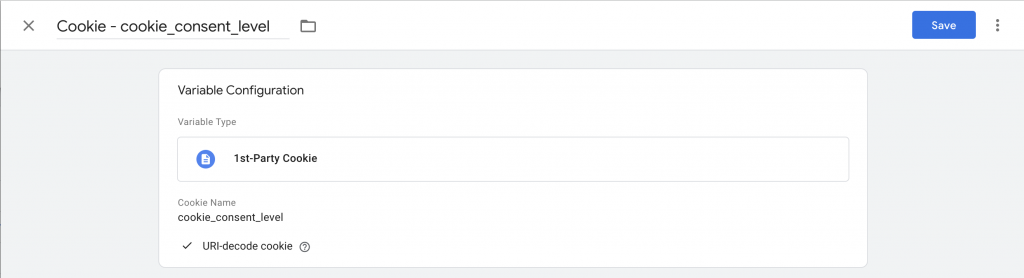
- First of all, create a 1st-Party Cookie variable in GTM with your consent cookie name
Therefore, we’ll be able to extract consent type values from our consent cookie when users accepts or rejects the consent banner.
- Create a Custom JavaScript variable to extract each consent type
We’ll create different Custom JS variables in GTM to extract each consent type. Since our cookie consent banner only grants four types (functionality, necessary, targeting, tracking), I’ll create four different variables. I’ll provide just one example below for the “functionality” type. Please create different variables for each of them by changing the “functionality” text in the code below. If you’re using the same cookie banner on your website, name all the variables as follows:
cJS – functionality cookie, cJS – necessary cookie, cJS – targeting cookie, cJS – tracking cookie.
Example for the functionality category :
function() {
  var consentTypes = {{Cookie - cookie_consent_level}}
  if (consentTypes == undefined) {
    return "denied"
  } else {
    consentTypes = JSON.parse({{Cookie - cookie_consent_level}})
    if (consentTypes["functionality"] == true) {
      return "granted"
    } else {
      return "denied"
    }
  }
}
This code block will create a variable from our “Cookie – cookie_consent_level” variable to retrieve all consent type values. It will parse them as a JSON object and return “granted” if the “functionality” value is true, or “denied” if it’s false or undefined. GTM only accepts “granted” or “denied” values for consent types.
Setup Consent Template
GTM requires templates to GET and SET consent settings. While you can achieve this with gtag library commands, it’s not guaranteed by Google’s documentation. Therefore, Google recommends using Google Tag Manager templates. You can find all the details in google’s consent template documentation.
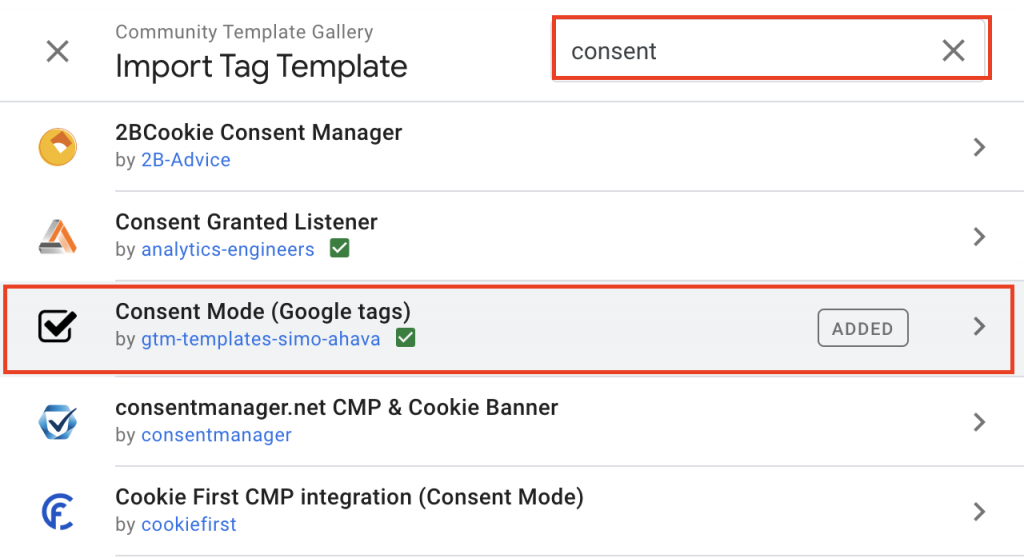
We will use a pre-made template by Simo Ahava for this purpose. Navigate to the Templates section in GTM and search for the “consent” tag template and add Simo Ahava’s “Consent Mode” template to your workspace.

We will use this template for different purposes, actually in two cases. GTM needs “Default” and “Update” status before firing a consent-sensitive tag. So, we will use this template to set the “Default” consent status. Additionally, when the user accepts the consent banner, we need to use it to update the consent status on the first page. This is to prevent losing any UTM parameters or page information.
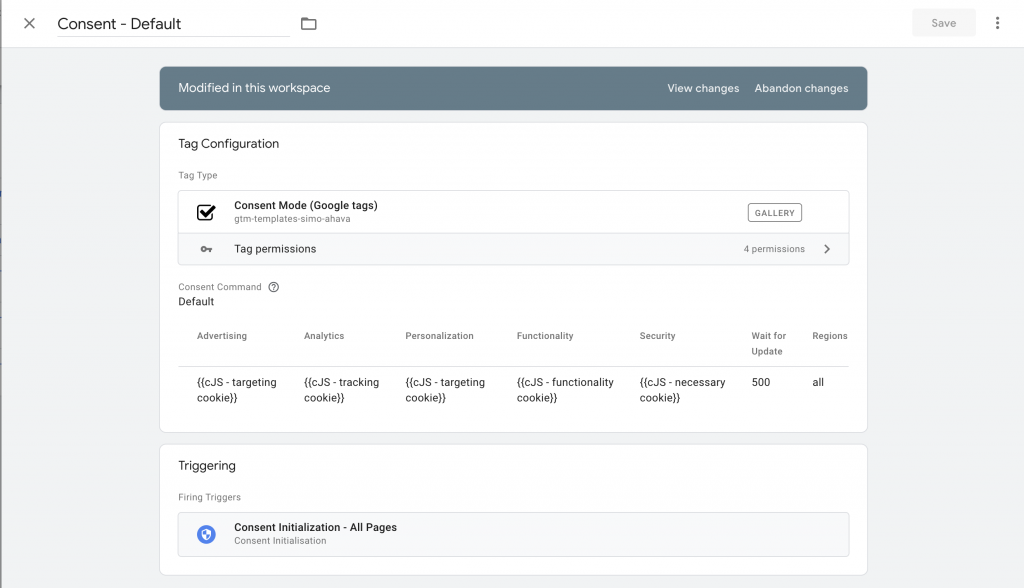
Create the “Default” Consent Status Tag
Create a tag by selecting the “Consent Mode” type and use the custom JavaScript variable that we created earlier for each consent type. Please refer to the screenshot below.
Make sure to select “Consent Initialization” as the trigger, as it’s the right place to set “Default” consent configurations.
Create the “Update” Consent Status Tag
Now, we need to consider whether the user accepts or rejects the consent. In this case, we need to create another consent template tag to update the “Default” consent settings.
Important note: You should send an event to the dataLayer if the user clicks the “Accept” button. This allows us to fire an update tag. Add the following code after your consent banner code:
  var checkConsentBanner = setInterval(function(){
    var accBtn = document.querySelector(".ACCEPT-BUTTON-CLASS")
    if(accBtn!==null){
      accBtn.addEventListener("click",function(e){
        dataLayer.push({
          event:"consent_accepted"
        })
      })
      clearInterval(checkConsentBanner)
    }
  },100)
The only thing you need to do is update “.ACCEPT-BUTTON-CLASS” with your consent banner’s accept button class. For our consent banner example, it will be “.cc-nb-okagree“
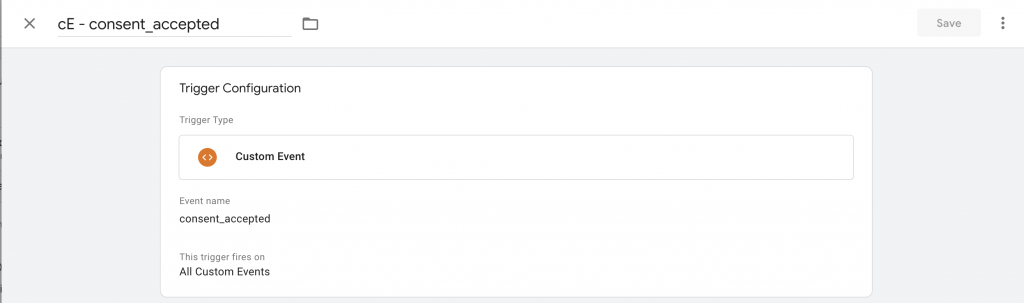
First, create a custom event trigger. We push the “consent_changed” event to the dataLayer when the user clicks the “Accept” button. Use this trigger for the “Consent Update” tag.
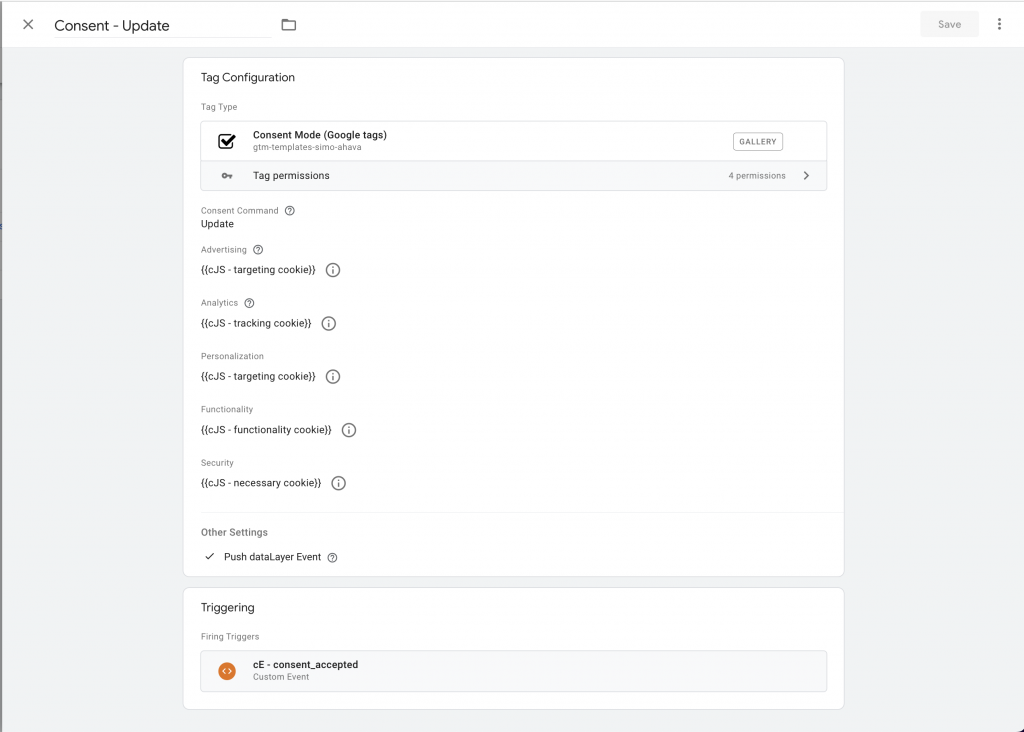
Don’t forget to select the “Push dataLayer Event” option to receive an event after the consent is fully updated. It will push the “gtm_consent_update” event to the dataLayer. We will use this event to trigger our tags when consent is updated on the same page. Otherwise, you would have to wait until the user navigates to another page to fire consent-sensitive tags, as the “update” tag only updates consent settings. Consent-sensitive tags can’t listen for consent changes without events. Thus, we can update consent settings when the user accepts the consent.
Configure Consent Settings For Your Tags
Configure your tags to make them consent-sensitive. Select the tag you want to make consent-sensitive and configure the consent settings, which can be found in the advanced settings section. I’ll use my GA4 configuration tag as an example:
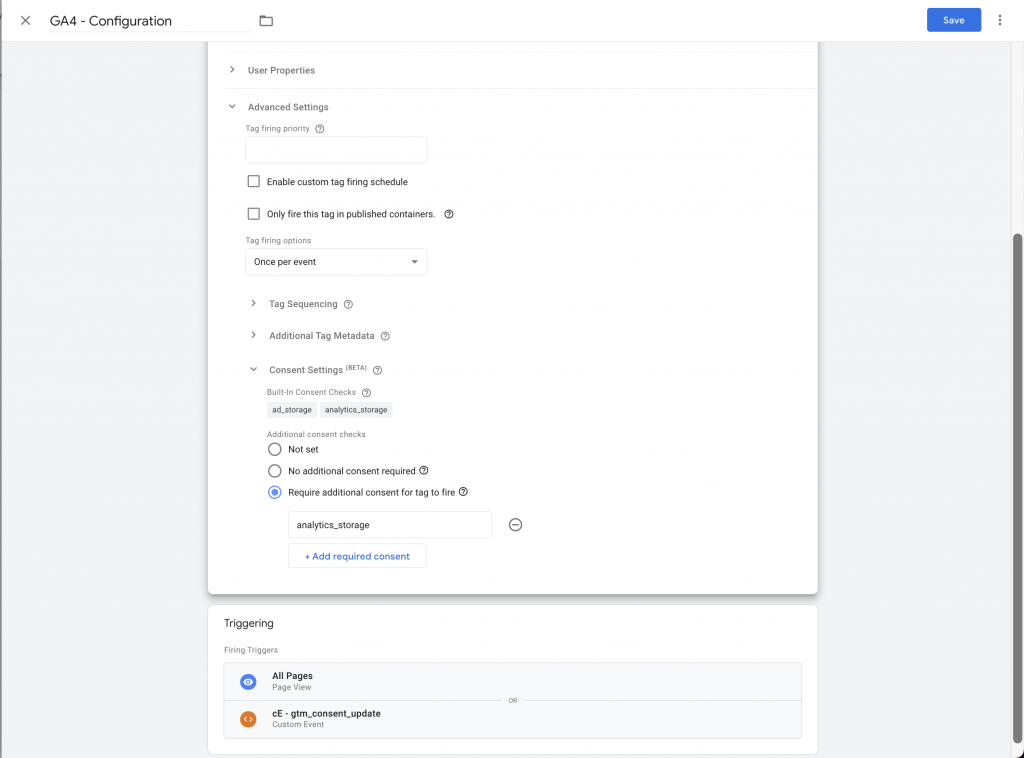
Since Google Analytics needs consent for “analytics” we will use the “analytics_storage” value that we set in the consent update and consent default tags. Additionally, add the “gtm_consent_update” custom event trigger to this tag to listen for the latest consent changes.
By following these steps, you can successfully set up and manage your cookie consent banner and consent settings using Google Tag Manager.