As I always say, if you don’t have a good understanding of JavaScript, you can’t be a technical digital marketer. At least, as people who implement and manage data flows, we need to know the basics (probably more). That’s why I want to start the “JavaScript for Digital Marketers” series. If you also want to learn JavaScript but as a digital marketer, you want to focus only on what will be useful for your job and not waste time with all the intricate details, this series was designed for you.
The first topic is arrays and objects because you’ve probably encountered the need to shape the data that comes into the dataLayer when sending data to different vendors like Facebook Pixel, Google Ads, etc. Or you’ve come across the fact that some events don’t arrive in the format required by the dataLayer and you need to reshape them. To be honest, a significant part of our work is about dealing with objects and arrays. Therefore, in this article, I will try to exlpain to how we can use arrays and objects in our daily lives.
NOTE: We use ES5 standarts in this article since Google Tag Manager does not support the ES6.
JavaScript Objects
Objects are one of the JavaScript data types which store data as key and value pairs. An object defines by curly brackets {}. For example, if you want to store products informations to send Google Tag manager, Analytics etc. it will look like this :
var item = {
  item_id: "SKU_12345",
  item_name: "Stan and Friends Tee",
  affiliation: "Google Merchandise Store",
  coupon: "SUMMER_FUN",
  discount: 2.22,
  index: 0,
  item_brand: "Google",
  item_category: "Apparel",
  item_category2: "Adult",
  item_category3: "Shirts",
  item_category4: "Crew",
  item_category5: "Short sleeve",
  item_list_id: "related_products",
  item_list_name: "Related Products",
  item_variant: "green",
  location_id: "ChIJIQBpAG2ahYAR_6128GcTUEo",
  price: 9.99,
  quantity: 1
}
As you can see above, we created a variable named as “item” and it stores all the product details with key and value pairs in an object.
Also we can store different data types in objects such as functions, arrays etc.
From this point on, we will proceed in a more practical manner. So, open the console tab of your browser by pressing (Option + ⌘ + J on Mac, Shift + CTRL + J on Windows).
If you want to create an object you can use the different method :
var obj = new Object()
OR
var obj = Object.create(null)
OR
var obj = {}
If you want to read a value from an object you can use ” obj.key “ or “ obj[‘key’] “ notations. ( example : item.quantity or item[‘quantity’] ) and you can also use the same way to define a new key and value to the desifred object. (items.x = true or items[‘x’] = true )
Object Methods
There are some important methods that help us to use the object data type. I will only focus three of them which i use frequently in my daily life since the article focused on “JavaScript for digital marketers”.
Object.values()
Loops the giving object to get the all values and returns all of them as an array. We get all the ‘values’ of the given object below :
var obj = {category:'menu', action:'click', label:'about-us'}
var values = Object.values(obj)

console.log(values) // result ['menu','click','about-us']
Object.keys()
Returns all the object keys as an array. We get all the ‘keys’ of the given object below :
var obj = {category:'menu', action:'click', label:'about-us'}
var keys = Object.keys(obj)

console.log(keys) // result ['category','action','label']
Object.assign()
Combines two different object in one object. Two different objects has been combined in one below :
var obj1 = {category:'menu', action:'click', label:'about-us'}
var obj2 = {parameter:'img1', type:'image', location:'home'}

var assign = Object.assign(obj1,obj2)

console.log(assign) // result {action:"click", category:"menu", label:"about-us", location:"home", parameter:"image", type:"hover"}
JavaScript Arrays
Arrays are just one of the JavaScript data types (Such as string, number, boolean, object, null, undefined, and function). Basically, arrays are ordered lists that can hold different types of values, storing them side by side and defined by square brackets “[ ]”. If you use the array data type to create ordered data lists it will look like this: [“digital”, 34, true, null, undefined, {}]
To create a new array, run the following command in the console:
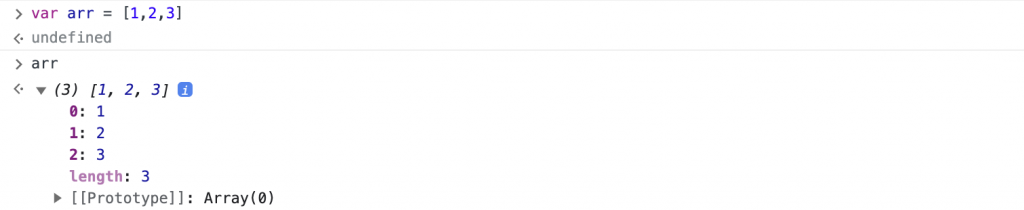
var arr = new Array(1,2,3)
OR
var arr = [1,2,3]
If you later call the “arr” variable we created, you will see that it contains an array with the values 1, 2, and 3.
In the JavaScript language, index numbers start from 0. So, if you want to retrieve only the first element of the “arr” variable we created above, you need to execute the command “arr[0]”. Furthermore, to get the information about how many elements are in an array, you can simply run the “arr.length” command. However, keep in mind that “length” will start from 1, so if there are 3 elements in the array, it will return 3.
The “dataLayer” variable is also an array. As you may know, when we add Google Tag Manager or Google Tag code to our website, a variable named “dataLayer” is created on our site, and we use this array for all tracking processes. For example, to enable enhanced e-commerce tracking, we ask developers to send information to the dataLayer in steps such as product views, adding items to the cart, and making purchases, which include details about the products and the purchase.
The logic here is the same as the array concept I explained earlier. Google Tag Manager or Google Tag code creates an array named “dataLayer” with the following commands:
dataLayer = window.dataLayer || [];
This command checks whether a variable named “dataLayer” has been previously created. If it has been created, it creates variable which inherit the old dataLayer array. If it hasn’t been created, creates an empty array.
Array Methods
There are various predefined methods in JavaScript that allow us to perform operations on arrays. You can see the complete list in the following screenshot:
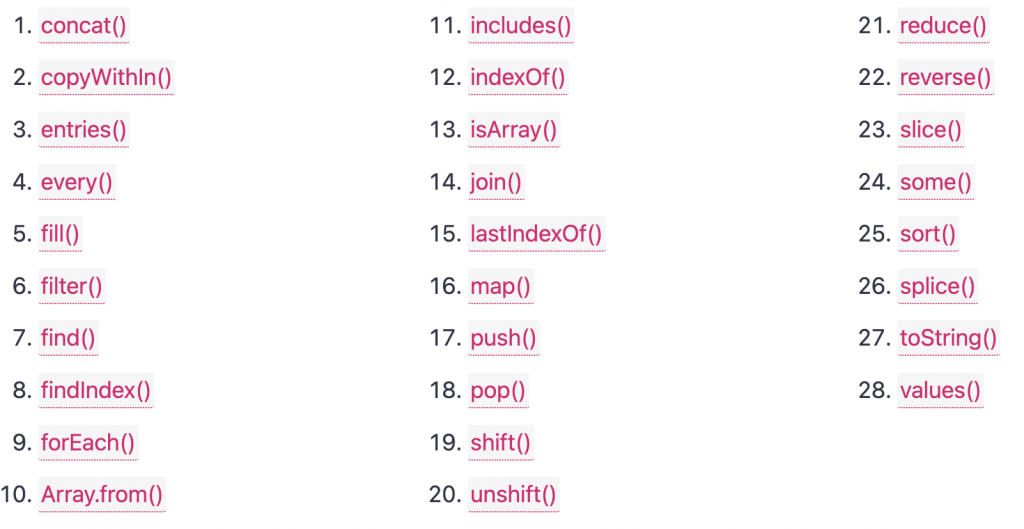
In this article, we will focus on the array methods that are particularly useful for Tag Manager tags. I will explain some of them briefly. If you want to examine the entire list, you can use the following link: JavaScript Array Methods
.filter() :
It puts the given array in a loop and creates a new array by picking elements that match the given condition. In the example below, we made a new array called “newArr” with elements greater than 5 from the original array.
var arr = [1,2,5,10,20]
var newArr = arr.filter(function(e){
  return e>5
})

console.log(newArr) //result [10,20]
.forEach() :
Unlike filter, it doesn’t return a value back but allows you to directly perform actions. In the example below, all the elements in the array are involved in an addition and assigned to the “total” variable to see total sum of all the elements in the array.
var arr = [1,2,5,10,20]
var total = 0
arr.forEach(function(e){
  total+=e
})

console.log(total) //result 38
.includes() :
It allows you to check whether an element is contained within an array. In the example below, it checks if the “arr” array contains the number 5.
var arr = [1,2,5,10,20]
var arrIncludes = arr.includes(5)

console.log(arrIncludes) //result true
.indexOf() :
It helps us determine the position (index) of an element in an array, and if the checked element is not found, it returns -1. In the example below, we got the position of the number “5” within the “arr” array.
var arr = [1,2,5,10,20]
var arrIndex = arr.indexOf(5)

console.log(arrIndex) //result 2 (index numbers starts from 0 in javaScript)
Array.isArray() :
In the JavaScript language, arrays are actually a type of object. The command “typeof [ ]” will return the value “object”, which can make it difficult for us to determine whether a variable is truly an array or an object when performing type checks. The isArray method checks the variable and if it’s an array, returns the value “true”. In the example below, we chek whether the “arr” variable is an array.
var arr = [1,2,5,10,20]
var arrCheck = Array.isArray(arr)

console.log(arrCheck) //result true
.join() :
Concatenates the elements inside an array using a specified character and returns a string. In the example below, we concatenated all elements in the “arr” array with a ” , ” character.
var arr = [1,2,5,10,20]
var joinedArr = arr.join(",")

console.log(joinedArr)//result "1,2,5,10,20"
.map()
It allows you to loop through a given array, perform operations on values and returns an array. In the example below, we’ve added “5” to all the numbers in the “arr” array.
var arr = [1,2,5,10,20]
var newArr = arr.map(function(i) {
    return i+5
})

console.log(newArr)// [6, 7, 10, 15, 25]
.push()
It allows you to add an element to the end of a given array. In the example below, we added the number “30” to the “arr” array.
var arr = [1,2,5,10,20]
arr.push(30)

console.log(arr) //result [1,2,5,10,20,30]
.pop() :
It deletes the last element of an array and returns the deleted element. In the example below, twe deleted he last element of the “arr” array.
var arr = [1,2,5,10,20]
arr.pop()

console.log(arr) //result [1,2,5,10]
.shift() :
It deletes the first element of an array and returns the deleted element. In the example below, we deleted the first element of the “arr” array.
var arr = [1,2,5,10,20]
arr.shift()

console.log(arr) //result [2,5,10,20]
.unshift() :
adds an element to the beginning of an array (similar to the .push method but it adds to the beginning). In the example below we add the number “0” to the beginning of the “arr” array.
var arr = [1,2,5,10,20]
arr.unshift(0)

console.log(arr) //result [0,1,2,5,10,20]
.reduce()
It allows you to reduce an array to a single element. For example, it enables you to perform operations on each element of an array and accumulate the result without need for an additional variable. In the example below, we added up all the elements in the “arr” array assigned to the “sum” variable.
var arr = [1,2,5,10,20]
var sum = arr.reduce(function(acc,it){
    return acc+it
})

console.log(sum) //returns 38
.slice()
It creates a new array by taking elements from a given array within a specific range. In the example below, we create a new array by taking the elements between the 0th and 2nd indexes of the “arr” array.
var arr = [1,2,5,10,20]
var slicedArr = arr.slice(0,2)

console.log(slicedArr) //returns [1,2]
Demo
For example, let’s imagine that our client is using a open source e-commerce infrastructure, and we are trying to set up the “purchase” event. However, this e-commerce infrastructure does not send a “purchase” event to the dataLayer when user complete the transaction. Instead, it sends the details of the order in a format that is quite different from what we need, under the “order” variable. You can refer to the screenshot below for an example.

We need to create a “purchase” event with all the data found within the “order” variable. For reference, please check the event format in the documentation: gtm purchase event structure.
Here are the steps to follow:
- Create an “ecommerce” object.
- Define basic parameters like tax, shipping, currency and value within the “ecommerce” object.
- Since the total order amount is not provided, calculate the total product prices using the “reduce” function and create the “ecommerce.value” variable.
- Create an “items” array within the “ecommerce” object.
- For each purchased product, send the item details such as item_name, item_brand, item_category, item_variant, discount, quantity and price within separate objects inside the “items” array.
- Filter out the “gift” product with a price of “0” and lacking detailed information from the “items” array.
- Send the “purchase” event to the dataLayer.
//create ecommerce object
var ecommerce = {}

//create required parameters
ecommerce.transaction_id = order.orderId
ecommerce.tax = order.extras.tax
ecommerce.shipping = order.extras.shipping
ecommerce.currency = order.curr

//calculate total order value by item prices with reduce function
ecommerce.value = order.products.reduce(function (acc,it) { return acc.total+it.total })


//create items array to fill with product informations
ecommerce.items = []

//exclude the "gift" product before continue since it has 0 price
var validOrders = order.products.filter(function (e) {return e.total>0})

//shape the items with defined variables names in Google's documentation and push them to the ecommerce.items array as an object.
validOrders.forEach(function (e) {
    ecommerce.items.push({
        item_id:e.id,
        item_name:e.name,
        discount:e.disc,
        item_brand:e.brand,
        item_category:e.category.split(">")[0],
        item_category2:e.category.split(">")[1],
        item_category3:e.category.split(">")[2],
        item_variant:e.size,
        price:e.total,
        quantity:e.qty
    })
})

//push the final shaped version of purchase event to the dataLayer array.
dataLayer.push({
    event:"purchase",
    ecommerce:ecommerce
})
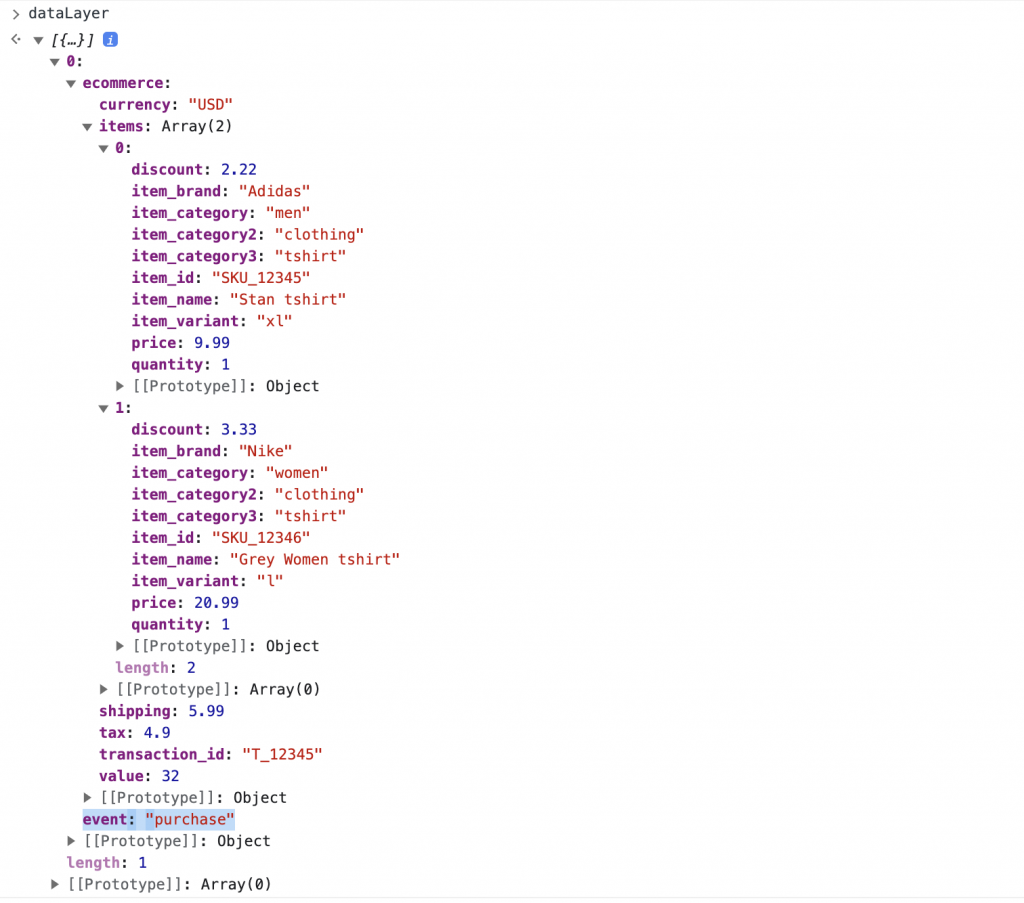
Using the code above, we format the information within the “order” variable as specified in the Google enhanced e-commerce documentation and send it to the dataLayer. This means we now have a proper “purchase” event.
To make the code work, create a “custom HTML” tag, and then ensure it runs on your order completion page.
The next steps is creating a custom event trigger like we have a proper purchase event in the dataLayer, link it to the analytics event tag, and activate the e-commerce feature.
Conclusion
In this article I’ve tried to practically explain how we can use objects and arrays in our daily lives as a digital marketer. Of course, there’s much more to it, but you can be sure that you’ll use everything in this article frequently. If there’s demand for this serie, I’m considering continue it. Cheers!