
If you’re interested in conversion rate optimization, A/B testing, or front-end development, you’ve probably wanted to write your own code or at least wondered about the logic behind it. In this article, we specifically covered topics like DOM manipulation and how changes can be made on a web page with JavaScript, how to add or delete an element, and how to style existing elements. Hopefully, you find the article useful. In my previous article, i also covered JavaScript arrays and objects, you can access it from here. Let’s jump to the topic.
Document Object Model (DOM)
The Document Object Model (DOM) is an interface designed to access and manipulate elements on a web page through web browsers. In short, you can refer to the entire HTML page and all information related to elements on the page as the DOM.
A web page is composed of structures known as the DOM tree. The typical structure is usually as follows:
- #DOCUMENT
- HTML
- HEAD
- META
- TITLE
- STYLE
- Etc.
- BODY
- DIV, H, IMG, P, SPAN, A Etc.
- HEAD
- HTML
As you can see, the ‘document’ is at the top of our tree structure, and all other elements are located within the ‘document.’ You can use the “developer tools” in your web browser to view the DOM tree structure of any web page. For example, you can right-click on any web page and select the “Inspect” option in Google Chrome. In the opened window, you will see all the elements present in the DOM.
JavaScript DOM Selectors
To access elements on a web page, we need to use DOM selectors in JavaScript. To use selectors, we require the following methods.
NOTE: Please keep in mind that in CSS, classes are represented with a dot (.), and IDs are represented with a hashtag (#) character.
getElementsByTagName
This method allows us to select elements on the page by their tag name (img, h1, p, span etc.).
document.getElementsByTagName('img') // It returns all 'img' elements.
getElementsByClassName
This method allows us to select elements on the page by their class name.
document.getElementsByClassName('img-big') // It returns all elements with the 'img-big' class.
getElementById
This method allows us to select an element on the page by its ID name.
document.getElementById('link-title') // It returns the element with the 'link-title' id.
querySelector
This method allows us to select elements on the page using CSS selectors. It returns the first matched element on the page.
document.querySelector('div>h1') // It returns the 'h1' element inside the first 'div' element on the page.
querySelectorAll
This method allows us to select elements on the page using CSS selectors. It returns all matched elements.
document.querySelectorAll('div>h1') // It returns all 'h1' elements inside 'div' elements on the page.
Instance Methods & Properties
Using one of the methods mentioned above, we can access DOM elements on the page and modify their various properties. At this stage, there are many methods and properties available for us to use. Below, I will highlight the most commonly used methods and properties. For the full list you can use this link.
innerText
It is a method that allows us to retrieve or update the text content inside a selected element.
document.querySelector('#abc').innerText = 'Buy Now' // It changes the text inside the element with the 'abc' id.
innerHTML
It is a method that allows us to retrieve or update the HTML code contained within a selected element.
document.querySelector('#abc').innerHTML = '<p>Buy Now</p>' // It updates the content inside the element with the 'abc' id using a 'p' element.
value
Some elements like input and option does not have an innerText property to change their visible text. To modify the displayed text for these elements, you should use the value property.
document.querySelector('#input1').value = 'Click Here !' // It updates the 'value' attribute of the element with the 'input1' id.
setAttribute
It allows us to add HTML attributes to the selected element.
document.querySelector('#abc').setAttribute('class','img-big') // It adds the 'img-big' class to the element with the 'abc' id.
getAttribute
It allows us to retrieve the HTML attributes of the selected element.
document.querySelector('#abc').getAttribute('class') // It returns the 'class' attribute of the element with the 'abc' id.
removeAttribute
It allows us to remove the HTML attributes of the selected element.
document.querySelector('#abc').removeAttribute('class') // It removes the class attribute from the element with the 'abc' id.
classList
It allows us to retrieve the classes of the selected element.
document.querySelector('#abc').classList // It returns all the classes of the element with the 'abc' id.
Additionally, you can add or remove classes on the selected element using functions like .classList.add() and .classList.remove().
style
It allows us to add some style properties to the selected element and perform styling operations. Below, I will provide some examples.
document.querySelector('#abc').style.color='red' // It updates the 'color' parameter of the target element.

document.querySelector('#abc').style.margin='10px' // It updates the 'margin' parameter of the target element.

document.querySelector('#abc').style.padding='10px'  // It updates the 'padding' parameter of the target element.
parentElement
It allows you to target the parent/containing element of the selected element.
document.querySelector('#abc').parentElement // It returns the parent (containing) element of the element with the 'abc' id.
nextElementSibling
It allows you to target the next element that is neighbour to the selected element.
document.querySelector('#abc').nextElementSibling // It returns the next element located close to the element with the 'abc' id.
previousElementSibling
It allows you to target the previous element that is neighbour to the selected element.
document.querySelector('#abc').nextElementSibling // It returns the previous element located close to the element with the 'abc' id.
firstElementChild
It allows you to target the first element contained within the selected element.
document.querySelector('#abc').firstElementChild // It returns the first element inside the element with the 'abc' id.
lastElementChild
It allows you to target the last element located within the selected element.
document.querySelector('#abc').lastElementChild // It returns the last element inside the element with the 'abc' id.
createElement
It allows you to create a new element in the DOM.
Let’s make an example below: first, we create an element, add some properties to it, and then insert this created element into another element existing on the page.
var div = document.createElement('div') //It creates a 'div' element and assigns it to the variable 'div'.

div.setAttribute('class','container-div') // It adds the 'container-div' class to the element.

document.querySelector('#maindiv').appendChild(div) // It appends the created element to the element with the 'maindiv' id on the page.
appendChild
It allows us to add an element inside the selected element. Additionally, with the appendChild method, you can also change the position of an element within the DOM tree.
document.querySelector('#abc').appendChild(x) // It adds an 'x' element to the element with the 'abc' id (we will learn how to create an element in the next step).
document.querySelector('#maindiv').appendChild(document.querySelector('#abc')) // It moves the element with the 'abc' id inside the element with the 'maindiv' id.
insertBefore
While the appendChild method adds an element to the end of the selected target element’s children, the insertBefore method allows you to insert an element before any specific element.
var referenceElement = document.querySelector('#mainDiv').firstElementChild
document.querySelector('#maindiv').insertBefore(newNode,referenceElement) // It adds the newly created element named 'newNode' before the first element inside the element with the 'maindiv' id.
remove
If you want to completely remove an element from the DOM, you should use the remove() method.
document.querySelector('#maindiv').remove() // It removes the element with the 'maindiv' id from the DOM tree.
Demo
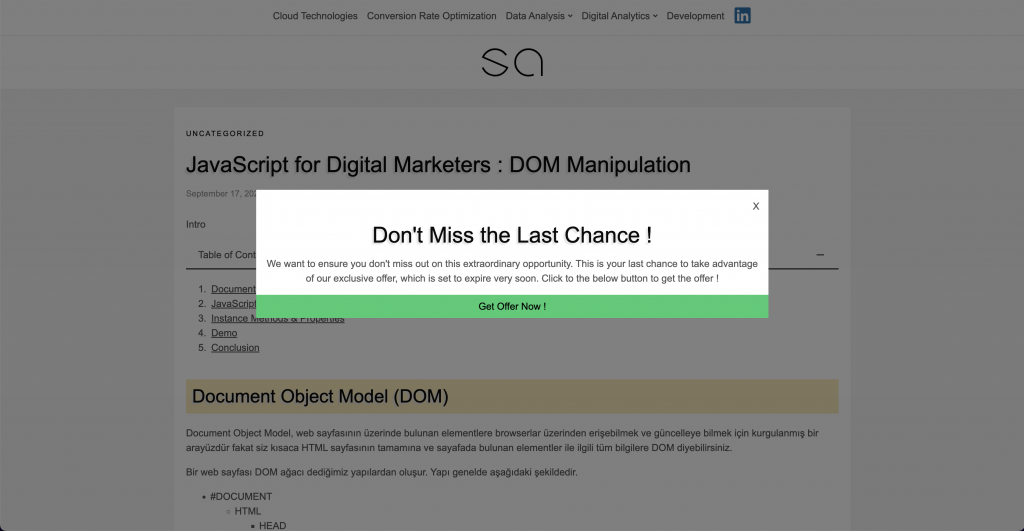
Let’s create a pop-up example with DOM Manipulation using most of the methods and properties that i mentioned above.
Here’s what we need:
- Container div
- Transparent background
- Modal container
- Modal div
- Texts, buttons, stylings etc.
- Close functionality
//Create main div elements
var container = document.createElement('div')
var blackBg = document.createElement('div')
var modalContainer = document.createElement('div')
var modal = document.createElement('div')

//Main Container stylings
container.style.height='100vh'
container.style.width='100%'
container.style.position='fixed'
container.style.top='0'
container.style.zIndex='999999'

//Transparent background stylings
blackBg.style.backgroundColor='black'
blackBg.style.opacity='0.5'
blackBg.style.height='100%'
blackBg.style.width='100%'

//Modal container stylings
modalContainer.style.position='absolute'
modalContainer.style.top='0'
modalContainer.style.width='100%'
modalContainer.style.height='100%'
modalContainer.style.display='flex'
modalContainer.style.justifyContent='center'
modalContainer.style.alignItems='center'

//Popup modal stylings
modal.style.width='50%'
modal.style.backgroundColor='white'

//Append transparent background and modal container to the container div
container.appendChild(blackBg)
container.appendChild(modalContainer)

//Append modal to the modal container
modalContainer.appendChild(modal)

//Create x button, append it to the modal div and style
var xButton = document.createElement('p')
xButton.style.textAlign='right'
xButton.style.margin='15px'
xButton.innerText='X'
modal.appendChild(xButton)

//Create title, append it to the modal div and style
var title = document.createElement('h1')
title.style.textAlign='center'
title.style.margin='15px'
title.innerText="Don't Miss the Last Chance !"
modal.appendChild(title)

//Create message text, append it to the modal div and style
var message = document.createElement('p')
message.style.textAlign='center'
message.style.margin='15px'
message.innerText="We want to ensure you don't miss out on this extraordinary opportunity. This is your last chance to take advantage of our exclusive offer, which is set to expire very soon. Click to the below button to get the offer !"
modal.appendChild(message)

//Create cta button, append it to the modal div and style
var cta = document.createElement('button')
cta.style.textAlign='center'
cta.style.border="0"
cta.style.padding="10px"
cta.style.backgroundColor='#2ecc71'
cta.innerText="Get Offer Now !"
cta.style.position='relative'
cta.style.width='100%';
modal.appendChild(cta)

//Set id's to our elements
xButton.setAttribute('id','xbutton')
cta.setAttribute('id','ctabutton')
container.setAttribute('id','pcontainer')

//Append container div to the HTML body element
document.querySelector('body').appendChild(container)

//Remove the container div when "xButton" clicked.
document.querySelector('#xbutton').onclick=function(){document.querySelector('#pcontainer').remove()}
If you run this code in your tag manager, A/B testing tool, or browser console, the result you will get is as follows.
Conclusion
It is really important to understand DOM and DOM manipulation topics if you are a digital marketer who developing a/b test, on-site communications, experiences, personalizations etc. Or even if you are learning frond-end development. I tried my best to explain DOM manipulation techniques. Hope you found it helpful. Don’t hesitate to contact with me if you have any questions. Cheers !